

Using ScriptLink with your Netsmart myAvatar implementation does not require that you use .NET or even C#. That is just what I primarily use. In this article we will be revisiting the creation of our first ScriptLink API in .NET, but this time using Visual Basic (VB). If you are more comfortable and proficient with VB, then you can stick with it.
In case this is your first exposure to the series, I will give you some background. In this series of articles, we will are looking at the myAvatar ScriptLink feature. ScriptLink is a feature that enables a form in myAvatar to connect to a separate web application (consume a SOAP API) to interact with the form or trigger additional processes, such as sending an email. A common example of how to use ScriptLink is to score a clinical outcomes tool and provide a prompt.
For example, a clinician completes a general Assessment and upon filing, ScriptLink calls the API which evaluates the responses and determines based on the results that the client may be at risk of death by suicide so a Suicide Risk Assessment is recommended and give the option to open that form at that moment. ScriptLink could then extend the functionality of the Suicide Risk Assessment to trigger notifications or create a Chart Alert based on the responses.
To leverage the ScriptLink feature in your environment you will need access to a developer or development team that can create the web application and API. You will also need to host the solution in your server room, data center, or in Netsmart’s cloud hosting.
This series is written for the developer who may new to ScriptLink or even development. The goal is to help your get started. Much of the series will looks at development in .NET using C# and hosting using Windows Server and IIS. However, this is one of the first exceptions. Today, we are staying within .NET, but using Visual Basic instead.
What You Will Need
Before we begin you will need the following.
- Visual Studio 2019
Community edition is free and will work fine for this series.
Create a Class Library
The first thing we will do is create a .NET Standard Class Library to define the OptionObject that we will receive from myAvatar. We will simplify and enhance this by using a NuGet package in the future. However, this will help to familiarize you with the OptionObject definition.
- Launch Visual Studio 2019 and select Create a new project.

- Set the Language filter to Visual Basic.
- Optional:
- Set the Project Type filter to Library or
- Search for Class Library.
- Select the Class Library (.NET Standard) Project and select Next.

- Name the Project. I am going to use RS.ScriptLinkDemo.VB.Objects.
- Optional: Change the Location.
- Name the Solution. I am going to use RS.ScriptLinkDemo.VB.
- Uncheck Place solution and project in the same directory.
- Select Create.

- Visual Studio will now scaffold your project. When complete, you should see your solution and project with a sample class (Class1) open for editing.
Create the Object Classes
Now that we have our Class Library project we will create our classes to define an OptionObject2015. Let’s go ahead and delete the default Class1.cs file that was created for us. You can also rename it if you like to use it for one of the upcoming classes.
The FieldObject
The FieldObject hold the content and metadata about a field located in myAvatar.
- Right-click on your project and select Add->Class…
- Name the class FieldObject.vb and select Add.
- You should now have a FieldObject class open and ready to define.
- Add the following properties.
Public Class FieldObject
    Public Enabled As String
    Public FieldNumber As String
    Public FieldValue As String
    Public Lock As String
    Public Required As String
End Class
- Save changes.
The RowObject
The RowObject defines a row on a myAvatar form. This includes a List<> of FieldObjects and some metadata about the row. The row is most prominent in myAvatar when using multiple iteration tables.
- Right-click on your project and select Add->Class…
- Name the class RowObject.cs and select Add.
- You should now have a RowObject class open and ready to define.
- Add the following properties.
Public Class RowObject
    Public Fields() As FieldObject
    Public ParentRowId As String
    Public RowAction As String
    Public RowId As String
End Class
- Save changes.
The FormObject
The name of the FormObject dates back to before myAvatar was released. A FormObject represents a section of a myAvatar Form. In myAvatar Form Sections are list in the top-left below the tabs and above the controls. Each FormObject (“section”) will contain at least 1 RowObject. The first/principal FormObject will only contain 1 RowObject.
- Right-click on the project and select Add->Class…
- Name the class FormObject.cs and select Add.
- You should now have a FormObject class open and ready to define.
- Add the following properties.
Public Class FormObject
    Public CurrentRow As RowObject
    Public FormId As String
    Public MultipleIteration As Boolean
    Public OtherRows() As RowObject
End Class
- Save changes.
The OptionObject
There are currently three different versions of the OptionObject: OptionObject (legacy), OptionObject2 (legacy), and OptionObject2015 (current). We will use OptionObject2015 as it is the current version and is required if you will use ScriptLink with Avatar Web Services. The OptionObject represents the myAvatar Form.
- Right-click on the project and select Add->Class…
- Name the class OptionObject2015.cs and select Add.
- You should now have an OptionObject2015 class open and ready to define.
- Set the class as public and add the following properties.
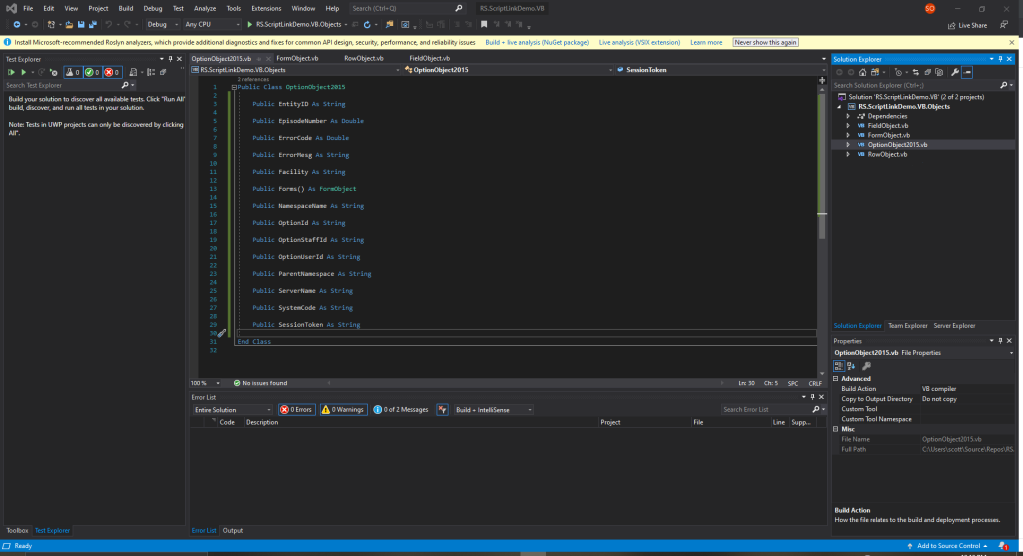
Public Class OptionObject2015
    Public EntityID As String
    Public EpisodeNumber As Double
    Public ErrorCode As Double
    Public ErrorMesg As String
    Public Facility As String
    Public Forms() As FormObject
    Public NamespaceName As String
    Public OptionId As String
    Public OptionStaffId As String
    Public OptionUserId As String
    Public ParentNamespace As String
    Public ServerName As String
    Public SystemCode As String
    Public SessionToken As String
End Class
- Save changes.
Excellent. Now we have our OptionObject defined. Let’s create a web application to publish our SOAP web service.
Create Web Application Project
The .NET SOAP Web Services we’re not ported to .NET Core, so we will create our web application with .NET Framework.
- Right-click on your solution and select Add->New Project…
- Set the Project Type filter to Web.
- Select the ASP.NET Web Application (.NET Framework) and select Next.

- Name the project. I will be using RS.ScriptLinkDemo.VB.Soap.
- Set the Framework to the latest version available. I will be using 4.8, however this walkthrough should work with versions as early as 4.6.2.
- Select Create.

- Select the Empty project template and confirm the Configure for HTTPS is checked.
- Note: When you setup your project that you will use in production, I recommend the following:
- Using Web Forms or MVC to add supporting documentation and links.
- Adding Authentication in case you want to controls or reporting to this web application.
- Selecting Also create a project for unit tests. More on this in a future article.
- Select Create.

- Visual Studio will now scaffold your web application.
- When complete, you will see and Overview page and links for additional learning. Go ahead and close this page. You can get back to it in the future by right-clicking on your web application project and selecting Overview.
We now have our web application. Next, we need to reference our class library and create our web service.
Reference Our Class Library
Please note that you may have issues with this if you selected incompatible project versions. For this walkthrough, the Class Library should be using .NET Standard 2.0 and the web application should be using .NET Framework 4.6.1 or later. The recommendation is 4.7.2 or later.
- In the web application project, right-click on References and select Add Reference…

- Check the box next to your Class Library and select OK.
- If you see a yellow triangle appear on it in the references list, make sure you have the correct .NET versions selected for each project.
Create Web Service
Since there are multiple versions of the OptionObject, I have established an organizational pattern to support backward and forward compatibility. We will use it in this example. You do not have to use it in your projects.
- Right-click on your web application project and select Add->New Folder.
- Name the folder api.
- Right-click on the api folder and select Add->New Folder.
- Name this folder v3.
This is because OptionObject2015 is the third version of the OptionObject. - Right-click on the v3 folder and select Add->New Item…
- Name the web service. I will be using ScriptLinkController.asmx.

- Select Add.
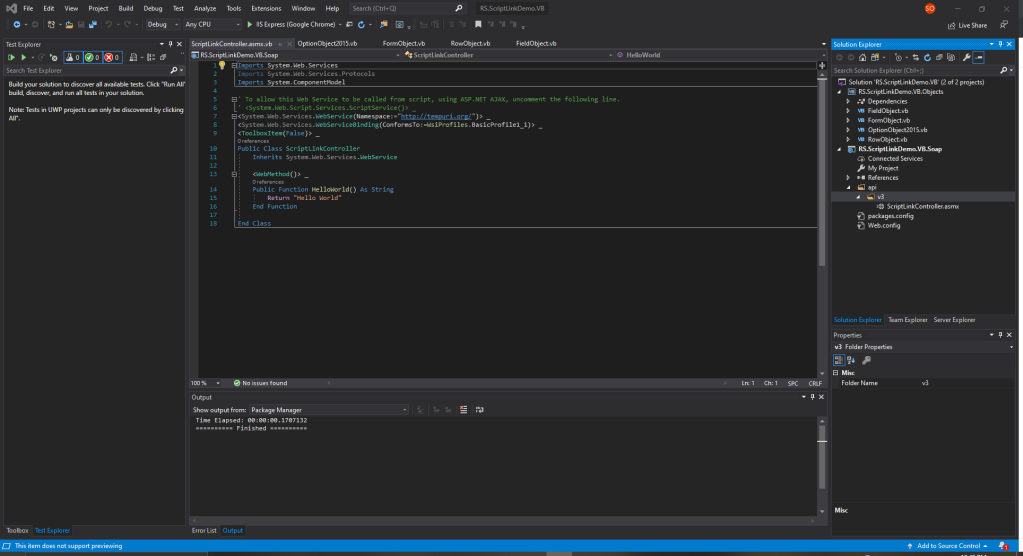
- You should now have a ScriptLinkController class open and ready for editing.
Configure Our Web Service
Netsmart has defined two methods that our web service will provide: GetVersion and RunScript. We will replace the default method with these two methods then configure RunScript to return the usual “Hello World!” string.
Define the Methods
- Add the using reference to your Class Library.
' Here is the reference to my class library
Imports RS.ScriptLinkDemo.VB.Objects
- Replace the HelloWorld web method with the following methods:
<WebMethod()>
Public Function GetVersion() As String
    Throw New NotImplementedException()
End Function
<WebMethod()>
Public Function RunScript(optionObject2015 As OptionObject2015, parameter As String) As OptionObject2015
    Throw New NotImplementedException()
End Function
Now we have to the two supported methods for ScriptLink and the RunScript is configured to receive and return an OptionObject2015.
Write The Return Code
GetVersion
The GetVersion method is straightforward. We just return a version number however we prefer (“v0.01”, “version 3”, “1.01.01”) as long as it is a string.
<WebMethod()>
Public Function GetVersion() As String
    Return "v.0.0.1"
End Function
RunScript
The RunScript method is different. We are required to return the OptionObject with only the FormObjects that have RowObjects to Add, Edit, and/or Delete. Additionally each RowObject should only contain the FieldObjects that are to be added or modified. This means we cannot simply return the OptionObject as we received it. We must prepare it for return and return it.
<WebMethod()>
Public Function RunScript(ByVal optionObject2015 As OptionObject2015, ByVal parameter As String) As OptionObject2015
    Dim returnOptionObject As OptionObject2015 = New OptionObject2015 With {
        .EntityID = optionObject2015.EntityID,
        .EpisodeNumber = optionObject2015.EpisodeNumber,
        .ErrorCode = 3,
        .ErrorMesg = "Hello, World!",
        .Facility = optionObject2015.Facility,
        .NamespaceName = optionObject2015.NamespaceName,
        .OptionId = optionObject2015.OptionId,
        .OptionStaffId = optionObject2015.OptionStaffId,
        .OptionUserId = optionObject2015.OptionUserId,
        .ParentNamespace = optionObject2015.ParentNamespace,
        .ServerName = optionObject2015.ServerName,
        .SystemCode = optionObject2015.SystemCode,
        .SessionToken = optionObject2015.SessionToken
    }
    Return returnOptionObject
End Function
What we have now is a SOAP API the will return a version number string (GetVersion method) and an OptionObject with an information message that reads, “Hello, World!”
Run the API
If all is well we should be able compile and run our solution.
- Press F5 to begin debugging with your default browser.
- We should see our API launched in our default web browser.

When you see this page, you can get the URL for your WSDL for testing by selecting Service Definition. I recommend using SoapUI and Postman to test your APIs. In an upcoming article I will walkthrough testing our API.

Please note that you shouldn’t import this WSDL into myAvatar as it is your local development and testing environment not your staging or production environments. I will cover deployment options in future articles.
You’re All Set
Congratulations! You just wrote your first ScriptLink API using .NET and Visual Basic.
It doesn’t do much yet, but you could deploy this to a web server and connect it to your Sandbox or UAT servers to see your “Hello, World!” message popup when launching a form, filing/submitting a form, exiting a field, or selecting a command button.
In my upcoming articles, we will cover turning this into a controller and changing behavior based on the parameter passed, testing the web service using tools like SoapUI and Postman, testing the web service with unit tests, and much more.

One reply on “Creating Your First myAvatar ScriptLink API Using Visual Basic”
[…] we left off, we had created our first Hello World ScriptLink API in .NET using C# and Visual Basic. If we created them correctly, the we should be able to call the RunScript method with the […]
LikeLike